Monday, December 8, 2008

A treatise on image formats

A few unrelated things lately have led to this. Now, a lot of you already know this, so please do skip over and ignore, but people from SL come from all sorts of backgrounds, so this is new (and rather important, if I do say so myself) information to some, as they aren't versed in such.

There are a large number of image formats available to us today. Some are more suited to certain applications than others. I come from a webnerd background, to a degree, so that's where some of my bent comes from, and I've been around long enough I've seen a few of these formats come to popularity. Now, you'll have to bear with me being opinionated and the memory of my failing brain, so some of the history here may not be entirely accurate. I'm old, dagnabbit.1 I'm also almost entirely self taught, so this is all stuff I randomly picked up here and there- and to add on, I'm going to gloss over some of the more accurate seriously technical bits and try to translate it into something that is, I hope, easier to understand, although possibly less technically accurate.

In brief: JPEG bad. BMP pointless and stupid. PNG awesome except for transparencies. Yay TGA!

I'm also going to do a bit of a runthrough of how _I_ do alphas with TGAs, at the bottom. This applies to Photoshop CS2, your mileage may vary when using any other version.


The JPEG and You

Ah, the ubiquitous JPEG. I've never really liked you, you know. Not even when you were the only viable game in town2 when it came to full colour- even though the poor little GIF was limited to 256, I always liked him better. (Note: I'm not going to cover the GIF. GIFs are lovely for small and portable oldskool pixel images with either/or transparency. They're pretty much useless when it comes to the sort of things you'll be doing in SL.)

You see, Mr. JPEG, you're a lossy format (lossy = oh, I can lose some of the information here and it won't really matter! No one will notice! Except when they will!). I really don't like it when someone decides that, oh, only parts of my image are important, let's just divide it into chunks, and make guesses about what the contents of the chunks are. I like all of my pixels equally, they are all my dearest darling wonderful children of light, and I am rather offended you think that it's "good enough" to just get kind of close.

In the land before the time of the PNG (oh, my favourite dearest for everything but SL, you magic format you), JPEG was really the option we had if we wanted to not have things be friggin' huge, and if we wanted to actually, you know, be able to load them. It's good for images with a lot of information in which not all of it is pixel specific- like photographs. Our eyes throw out a lot of that info anyway, since there's so much noise and variation. BUT, and here's the problem- JPEGs throw out MORE information. They use this funky algorythm that looks at chunks of pixels, and then instead of saving what each one is, it builds something that it is more efficient (at the time, as we're talking the deep dark ages here) than saving each pixel individually. But....if you ever save a JPEG a second time, it does that AGAIN, and it gets less acurate, each time. Plus, that slider of compression? Tells it the size chunks, the accuracy of guessing, and the more compression, the more assy your picture will be. This causes worse artifacting- you know when you look close and you can see those square muddy areas that aren't quite right?

Basically, AVOID AVOID AVOID. You do not EVER want to use JPEGs with SL. EVER. Trust me. There are better formats (and due to SL's recompression, the file size isn't even a deal). Also, in anything you do, NEVER use JPEGs for working copies. Save things you'll be working with again as any lossless format instead, because you lose information every time you save a JPEG, until you start seeing the mush, and that's crap.

If you're making sculpts, and you save your sculpt maps as a JPEG...You're fucked. 100% double fucked. Your sculpt map turns to jelly, because those actually need pixels to be WHAT THEY ARE, not just a half decent guess with a blindfold on. If you've got some severe lumpy mesh deformation going on, this could be your problem. Make sure no exporter or anything along the way uses JPEG.

Plus, SL uses JPEG itself. It recompresses everything you upload into JPEG2000 (which is a fancy smacktacular JPEG format that does more stuff, but is still a pissy little bastard and I hates him), so your artifacting gets worse due to the multiple save rule. Bright side? Your hugeass TGA file is a managable size and can actually be loaded by people's computers faster, and that's why they use it. Even though I'm still kind of against it. I told you I was opinionated!


The Mighty BMP, or Mommy, Why Is My File So Huge?

BMPs (Bitmaps, should you ever be at a dinner party and feel the need to show off that you are a GREAT HUGE NERD) are a really old skool format. They are lossless, so they fit my "use a lossless format" criteria. They're an old Windoze format that lets you save what you actually want (PICTs were the Mac equivalent, as they wanted to do something different, read: more efficient. Once upon a time it wasn't always easy to open PICTs on Windows, but I never had problems with BMPs on Macs. This is all ancient history, and feel free to completely ignore the old lady nattering on about her childhood and walking uphill to school, both ways, in the snow).

The downside though? Dear mother of god that's a big file. SL used to save your screenshots as BMPs, and you had no say in the matter. Which is why your harddrive filled up by leaps and bounds if you took snaps, because it's a horribly inefficient format, and we live in the modern age of miracles and flying cars, and have better options now. The newer SL viewers allow you to save your snapshots as PNGs. Do that, and be happy, as you don't take one snapshot and have your terabyte drive going "oh hai, I gots no more space."

Basically, we've another example of AVOID AVOID AVOID. Not because you're fucking yourself over with the actual image, but because there are better ways to do things now, and we don't need to bother with this jackassery anymore.


The PNG Comes to Save the Day. Sort of.

Once upon a time, there was this new up and coming format, the mysterious PNG. It was going to be magical and mystical, and let you put images in webpages that had more than 256 colours, but also were lossless and crisp and beautiful. What's more, this magical fairyland format was going to let you do transparency, which JPEG did not, and, oh!, you could also do gradual transparency so it wasn't just one colour set to clear, but you could have gradients and fades and it was all wonderful and beautiful and we lived hapily ever after.

And, of course, while this was a format targetted towards the web, Internet Explorer dragged its feet on implementing it properly, taking years and years to implement the transparency on the PC, while the Mac, and Netscape, had it wonderfully. Yes, I'm talking about Netscape, back when they actually updated it regularly, when it was the viewer of choice for most people. I told you, I'M OLD.

PNG is my format of choice when saving snapshots, it's lovely and portable, and it loves each and every pixel as all of its beautiful and perfect children, and wouldn't dream of forgetting one. I used to batch my screens as PNGs and trash the BMPs, to make space. It's as crisp as BMP, and your screen as you're seeing things, but it's smaller file size and takes a lot more to fill up your harddrive.

In short, it's perfect. All of the advantages, none of the disadvantages.

Oh, wait. That's not entirely true. There are disadvantages for content creators: the white halo of dOOOOOOOOOOm.

When it comes to making textures, PNGs are not quite as perfect as you would hope.

If you are making textures with no alpha, you're golden. Now, if you're making those textures in PS, you want to make sure they are REALLY without alpha, due to the dreaded alpha flicker- so make sure your PNG is totally and entirely flattened before saving, and says Background, not Layer 03, in the layers palette. Layer 0 gives you an alpha channel you aren't using- so it all looks nice and lovely, but you get it in SL and put a texture with alpha in front of it and cam around...and oh crap. Our z sorting issue is the price we pay for features like light, so we put up with it....for now. Even though it can bite my shiny metal ass.

The problem with PNGs, see, is that any pixel that's fully alpha, doesn't exist in colourspace. And because we read things at multiple resolutions with SL, and the way that it deals with the transparency (I'm going with "it's all JPEG2000's fault"4, although I sort of mostly ignored that format because it did a lot of floundering and dying in the areas in which I was interested....it was totally someone's pet nerd project, to use JPEG2000. One of the devs fell in love with the format and convinced everyone else he was right), the dead space gets SEEN. And dead space = white. So you get white edges, because SL divides the image up into "pretty colours" and "this is what we see" and loads them separately.

(Note: That Interlaced or none prompt? Is a loading order thing5. It means nothing to you, since SL makes them JPEG2000. I always leave it on none.)


Oh, Wait, You Mean You Want Me to Use a Real Game Format, Mr. TGA?

Our workaround here, is the TGA. Now, TGAs have disadvantages: namely, like BMPs, they are inefficient in their lossless compresion. TGAs are an actual proper format used in game design for real things, and it's got all sorts of extras that BMPs don't, and that's part of why it has the file bloat- even if you aren't using it, it sort of leaves the door open and decides that it needs to keep track of it all anyway.

I didn't say it was really the most brightest crayon in the box. Just that it was what worked the best!

I save ALL of my textures as TGAs, regardless of whether they have an alpha channel or not. It's easier for me than flipping back and forth to PNG, but that's a decision I leave up to you. Things with alpha channels should be TGAs though, period.

You see, TGAs save the dead space! They do alpha channels separately. This can make them more of a pain to work with, if you're used to the PNG way of just leaving areas you don't want seen with nothing on them. Because, see, with TGAs, your entire image is filled, and flat, and you don't see the transparency at all. And in the next section....we'll talk about the solution to adding your transparency. Look, really useful stuff finally!


Masks, Channels, Alphas, and How to Make It Not a Filled Up Square

TGAs are so useful because the alphas are separate from the image. You paint outside the lines on the image proper, but you make the lines somewhere else. If you're unfamilar with this way of working, it might be a bit of a challenge adjusting how you do things to make it work. I'm not going to tell you the way to do that, you're going to have to find out what works for you, as everyone finds a different way to do things. (After all, they're sort of endless!)

Now, technically, this applies to CS2. It MAY apply to other versions, however, I make no guarantees.

Do you know about Masks? Masks are lovely. If you have every used an adjustment layer, you see that black and white box, where the white areas get the adjustment layer applied, and the blacks don't? That's a Mask. Basically, a Mask is a separate alpha channel you can apply to any layer or folder, it's a little black and white box that pops up next to your layer (or folder), that lets you draw on it in greyscale. White = visible, black = invisible, and the greys in between are the gradient along the way to give you pretty edges and not make things pixelated. To add a mask to any layer, select that layer and hit the square with the circle in the middle in the bottom of the layers tab. When you have a mask and a layer, the one actively selected will have a dotted box around it in the layers tab, so you know which one you're drawing on.
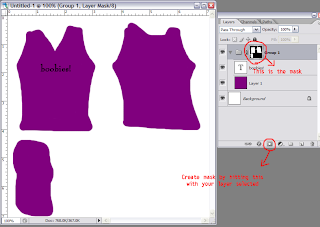

Yes, a drunken monkey drew this. Obviously, this is not what it should REALLY look like.

Now, to see your transparency in this brave new world of TGA, so things look like what's you're used to, make a folder, put evvvvvvverything in that folder, all your layers, and make new layers as you go in this folder, and make your mask on _that_ folder. Now, everything that gets seen, gets seen! And everything that doesn't, doesn't! It looks just like when you were doing PNGs! (Even if it means you have to _do_ it differently.)

When you turn that mask off, by holding Shift and clicking on it, you should see all the spaces outside the lines. Which should be very similar to the pixels next to them, that are seen. I leave it to you to decide how this is done. Fill a background layer behind it all with a colour that fits? Smudge an underlayer out? Draw all over the dead space in the first place and make things keep going? (This last one is my way, but I also come from a different graphic background....so I was doing it anyway.)

To make your mask, you have a few options. You can select a layer, or just make any selection, and either make your mask while that selection is active and it will apply it, or fill the mask with white (or black, if you want it invisible) in the selection (delete with your choice as the background colour, as a real fill may screw you over). You can also take your paintbrush and draw your mask right there as you go, using white to reveal areas, black to conceal. You can also use vector masks, which let you use Paths (PS's gimpy vector tools) to make hard edged selections that remain edittable. (Note: If you are interested in this, look up PS tutorials on Paths and Vector Masks for the techniques, I'm not going into it here. Its usefulness entirely depends on how you want to do things- it can be useful, or it can be extraneous and something you'll never want.)
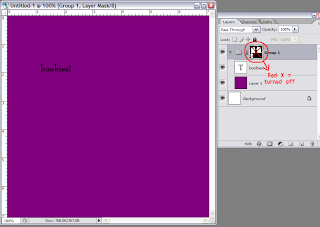


Now, once you're done, and you've got your image that spreds out beyond the invisible edges, and your lovely alpha mask....Turn that alpha mask off. Hold Shift, and click on it, and boom! your lovely selection goes away. Now, select your alpha mask (ctrl+click on mask), and go to the Channels tab. It should be in the window with Layers, it should say "Layers", "Channels", and "Paths" for the tabs at the top. Make a new channel, the same way you make a new layer, and fill that with white by deleting, or hitting invert, or whatnot.
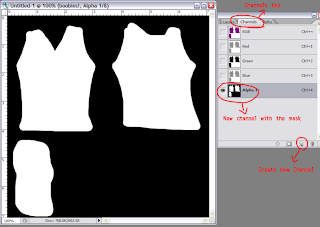


Now. DUPLICATE YOUR IMAGE. Trust me. You don't want to lose everything when you flatten it and accidentally save instead of save as. And you DO want to keep a layered backup, I'm sure you know by now!

Now, flatten your image. With the mask inactive, so it's all that messy outside the lines, and you have no lovely alpha....OR DO YOU? Because, see, you've got it in your channel!

Save your image as a tga. Make sure Alpha Channels is ticked on (and As a Copy isn't), then, it will prompt you:

16 bits/pixel
24 bits/pixel
32 bits/pixel

Ignore 16, forever and always, it means nothing to you. CHOOSE 32. If you have an alpha channel, you NEED 32. On the other hand....if you don't have an alpha channel, to get away from the dreaded flicker, you NEED 246. That says "oh hey, no alphas for us, nevermind!" instead of "I have an alpha channel even though it doesn't look like it, I just choose to make everything visible, so I can fuck with everything with transparency around me." Those extra 8 bits ARE the alpha, if it has that many, it has an alpha, period (and, as an added oh hey PS hates us bonus, if you don't have Alpha Channels ticked on in the save as dialog...it trashes your alpha channel and puts in a pure white one if you save as 32). If it doesn't have them, no alpha, regardless of your masking. You can open that file up again to look at it, and see if there is an extra channel there. (Remember, there will ALWAYS be 4 layers in there, for full view, red, green, and blue. The colour separations are awesome if you get into some wacky sculpting stuff- but generally not so useful with regular textures.)

Other uses for channels: you can cntl+click a channel and it will load that selection. If you have a selection you want to keep? Hey there sailor! There are also certain filters that can be used in conjunction with channels for whizbang effects. Now, you MUST make sure to delete all extraneous channels before you do your saving, since you don't want it to get confused!

For a last somewhat helpful note: if you're making clothing, save your image as 512x512, always. I make them double size, but my last step is scaling down. Why? Because SL will scale to 512x512 for you, regardless of what you want. That IS the resolution the avatar textures will be, period (and you gain nothing but crappy jagged edges if you go smaller). There is no way to squeeze more out, and this way you aren't making SL do another step of work, so things load better, faster, stronger. I work larger because I can play around with more detail and have more fine control.


1Ok, I'm not really THAT old. But I might be older than you. I remember the day before you young whippersnappers and your css, when we had to do all our formatting in HTML and tables, and we liked it.

2There was the BMP and PICT, of course, but I'm coming from a webnerd background here, and those were not viable options. Plus, I'll be getting to the BMP later.

3The thing you have to understand about computers, is that they're sort of dumb. They can't figure out there's no alpha unless you tell it repeatedly7. Flattening to Background is how you tell a PNG that no, really, FOR SURE, you didn't mean to have an alpha channel. Honestly. For reals. Trust me. No, really, PNG, I'm serious.

4In reality it's probably Photoshop's fault, with the way it does PNG alphas- since there AREN'T any pixels there in the first place, so it has to make shit up, and white is the colour of imaginary angel pixels, or something. However, I would really rather blame it on JPEG2000, because I keep grudges. Also, because of the way SL works, you get to see those imaginary pixels, so THERE, that IS JPEG2000's fault. Neener.

5Interlaced is kind of nifty for the web, back in the day when we were all on dialup and things went slooooooow. It would load the image in "stripes" kind of, instead of top down, so you would sort of see the image, and it would get clearer as it loaded. Kind of. Again, ignore.

6Again, see "computers are dumb". Because really, TGA, even though I told you once before already, I REALLY TRULY want an alpha channel if it's 32 bit7. And I REALLY DON'T if it's 24 bit. Also, if you save a TGA with a channel at 24 bit? Your channel GOES POOF. So make sure you save as the right bits! Also, this is another reason we make a duplicate of the image!

7There are, of course, limited cases in which you WANT an apparently solid image to actually have a transparency channel- if you're doing something fancy with invisiprims (like the flea with the magnifying glass), things that "look" solid will become invisible, and in limited cases, it's quite a clever effect. Just...not so awesome, unintentionally.
Thursday, November 20, 2008

I dream of wide open spaces

The Open Space announcement from LL was...disappointing. It's the right decision done in totally the wrong way, basically. Yes, limitations needed to be added to the existing, and obviously there needed to be another tier, in between the two.

But this....is verging on ridiculous. To go from 3750 to 750, for the same price, is just... Really, did they think this was going to make anyone happy? And then, the new Homesteads, still to be stacked in 4 (oh, _maybe_ we'll consider 3), since the stacks of the Open Spaces were what they were stating as the problem?

Really now. This is just another way to get people to leave. God knows, I'm considering it (I won't, of course. At least, not until my friends do. But I have signed up for another grid in the meantime, but they're a ways away from being a real threat....but eventually, they will be).

Instead, what I think they SHOULD have done, is make Open Spaces what they were meant to be, what they were SOLD as: 3750 prims. However, add in the hard limits to avatars and scripts to ensure they aren't "abused". Then a midway sim that's stacked in 2, rather than 4, that's more of a half sim, again with limits that are somewhat less restrictive than Open Space. I fear this is a case where they saw all the money they "could" have been making by charging more for the minisims, and got too greedy. There were problems that they should have seen coming (seriously. I saw them coming and I'm not on the damn technical staff and don't know much about their load capacity), and could easily deal with, since they run the whole system.

There's a huge amount of art and beauty that will soon be dead because of the change: places that could have been worked as legit Open Space sims with the limits placed upon them, but which need the higher prim limits (750? That won't go anywhere). A lot of people were able to justify the price tag for sims that served little purpose other than to be a playground of beauty, and SL NEEDS more of that.

I'm sad I won't see them all before they go- I will only see a small fraction of them.

Wednesday, April 16, 2008

Mapping problem, cont.

(These are mostly personal musings on problem- I'm not explaining it explicitly enough to describe it for others currently [primarily because I think to really explain, I'd have to draw diagrams, and I'm still not sure how well I could translate 3D deformed space to 2D flat and still retain any sort of clarity]. I'm still looking around for potential solutions, but am just coming up with more problems instead.)

Upon further research, the wall gets taller. Apparently there are a number of imperfect tools out there to try to get around the problem (including one that takes an obj and imports it as a sculpt through the SL menu...which, aside from the fact it's extremely touchy on what you can ever try, I generally don't trust at _all_), and it sounds like they all do it badly. There's a big discussion on the forums about trying to do it and how tos in ways that...I just don't understand why they're trying to do it _that_ way, as it seems like the hard way to me. Looks like Blender is not the only program to not map proper though (no programs were raised as "well, you know x does it right, even if it is expensive" which isn't really heartening. If Maya actually got around it without all the hoops and etc....)

Tacked on, I'm not 100% sure I'm on the right page with the way SL does it. Mostly I'm a little perplexed as to texture mapping regarding, as they seem to be at odds to me (which is another dimension of The Problem with inaccuracy). At least in certain ways- it mostly comes down to "well, you stitch it this way and I get it. But you stitch it that way and I'm starting to get a little confused." There's also one more somewhat esoteric and bizarre stitching method I'd love to have, just generally (a modified sphere stitching, basically. It's odd and strange enough although it makes sense while modeling that I can't see it even being something they would consider adding, as much as it would be useful).

Worse, in regards to my immediate problem...I'm not sure where I stand on that at all. This is not 100% due to the inaccuracy problem (now, raise the prim limits to 20x20x20, and I wouldn't have any of that dimension at all, because I wouldn't have to worry about splicing bits and could skip my problematic steps. *sigh* I wih megaprims came in more useful sizes, and the massive chunk of them weren't just hacked to make it work in one particular manner this way, which means it won't with anything else), but also due to a bit of uncertainty how to actually approach certain features of the object itself. This is a point at which existing architectural reference would come in handy, as I'm not sure how x and y would translate properly, nor how much they would be desired. So yeah...spinning my wheels entirely until I can get a concrete vision on what I'm doing.

Tacked on, the thing for me...I'm still very heavily in the "that would be a nice thing to have" mode, not really the "ok, let's do this!" It's another thing that I need to wrap my head around the scale of before I can get much done, and I'm just...not sure at all. At least a) it's something that there is architectural reference of, even if I am not going those ways a lot, and b) I've already figured out how a fair bit of that will function regardless, prims willing.

Tuesday, April 15, 2008

Improper Mapping in Blender: a problem

I'm trying to be a little more zen about certain things annoying me (times when people refuse to stop jumping up and saying LOOK AT ME I'M RIGHT LOOK AT ME DO WHAT I WANT!...take a step back, a deep breath, and just stop feeding into it and walk away. They are free to think they won, in reality they aren't worth my time. There's a reason I'm a misanthrope). I know I'm also a bit less able to deal because I've effectively had a bad cold for a year and a half now. *sigh* I want to go home.

My new new irksome though is not related to people. I've finally run into the wall that I've known was there for a while about Blender's imprecision on mapping the sculpt texture. Instead of mapping the points where SL maps them, it has a tendency to basically map in between (this is most disasterous on the edges, as that's where the problem begins, and has the greatest deformation). This is not such a huge deal for a lot of sculpts: SL does a bit of deforming your mesh here and there anyway, although your seams may still be somewhat messy, which is not cool. This becomes a greater deal with sharp edges (which have needed a fair bit of PS post anyway, in my experience- even when they shouldn't), as, even when you redo the edges you've still got a pixel of messy lead in (which can be eliminated by making it the edge as well, so long as you can sacrifice it- but it still means the sculpt and texture are pulling off. One top of this, the corner corner top/bottom edges...are just a total wreck, because it doesn't pull them where it ought to.

In this case, I can probably reason through the math and do it all in PS from a Rokuro (not that I actually want to do that, but this problem right now is entirely fueled by the 10x10x10 prim size limit, it's not a hard shape in of itself), but that simply won't work in some cases, nor does it change the fact it's always stretching things improperly. I'm not comfortable with many of the tools in sculptypaint yet, and I don't think it has the robust _sculpting_ tools that I need, but it does map properly (too bad it doesn't import .objs itself for mapping), and, damn. Stairs. Truly, totally, awesome. Too bad I don't see a way to work another staircase I'd like to with it, that's going to be "a challenge" and require a lot of fixing it up in PS, I'm sure- although I think perhaps the map here has given me a good concrete view of how to (until I try it and find the niggling things I haven't thought of, of course). Aside from everything else, it's pretty brilliant for importing your sculpt map and finding out what havok Blender has dealt with the way it goes about it- whether it's even worth trying to pull into SL.

I've got an idea to try that will, I'm reasonably certain, require a bit of post to get functional (if it's even possible, which I'm not sold on- it's a kinda sorta maybe, not a perfect answer), to get around the problem. This model has enough other troubles inherent in the way Blender deals with it I'm not sure it's a model case to try though. (I think it would actually be pretty straightforward to write a program that would take the one data and convert it to the other correctly, that's just not something I'm up to. I do not write programs, and haven't any desire to learn that, a little light coding and scripting is more than enough, thanks.)

Friday, April 11, 2008

New viewer and code, joys and flaws

I've been running the Windlight Release Candidate for a while. The regular viewer started cascade crashing, and the other options out there (read: fan made viewers) weren't working right (one had the same crashing, the other corrupted textures constantly). I had found it to be a far more rock solid uncrashing viewer than the regular, by far. It's...not as much anymore. It's still not horrid, but not as stable as it used to be.

I'm sure they merged the code branches less because they were actually ready, and more because they didn't want to be working on multiple code branches at once, so they could just apply everything to WL (especially with the big move to Havok 4). Shoving both out at once makes it harder to see what is causing which flaw though.

I don't think it was lost on anyone what a massive clusterfuck the launch of Havok 4 was. Some of it wasn't even their fault.

Something has gone rotten with the camera. I don't know which one started it- the RC WL wasn't doing it, and the beta grid running Havok 4 wasn't doing it. But the proper viewer...yeah. They "fixed" the camera in the 1.20 RC, and I had to switch to the regular viewer instead, because it was making me queasy. The camera was often moving with less constraints and more sensitivity, and, and this is the bad part for me, it isn't updating the location of the selected outline properly. It lags behind the camera rotating around, which is very disconcerting, and well, not a fan. I'm not sure what's up here, but it ain't good.

(As an aside, I wish they'd rework the camera in regards to focusing on objects. Most noticeable in larger prims, so it shows in builds, not in jewelry, the camera has serious issues with hollows and dimpled cube/cylinder/prism surfaces. It wants to focus on the "outside" that isn't there. This is mostly not a deal...except that they've now semi sanctioned megaprims so more people are going to be using them, and with the extremely limited number around, a lot of them are dimpled to mimic other sizes, and, worse, the interior of cylindrical buildings of any type just doesn't work well. It would also be a great primsaver with hollowing and cutting for right angle walls and such- which some people do, to the camera's detriment.

As another aside, I wish they would just go ahead and up the prim size limit legitimately. I would kill for 20m instead of 10. More would be nice, but that would be a great start.)

1.20 also has Jazz Hands (aka Dazzle), which is ugly as sin, and has a lot of really bad UI choices. I really hope people are already working on skinning this hideous thing so it doesn't have to look like crap when they do force it on us.

The SKIRT BUG. Motherfucking pudding, but I can't believe they let this thing go live with that. Obviously, from things they've said, they just plain don't care. They've also been trying to say WL isn't the problem...in which case, why is that the thing that makes them go away? I know, I know, it's a packet thing blah blah, but come _on_. If you never used WL, you never got the bug. Therefore, don't make people change, until the bug is gone. Is this so hard to grasp? I know, we don't think skirts matter. This is why you will never truly be a viable economic platform, and people will jump ship when something else comes along. Not because you didn't "keep up" and put in voice and awkward lighting effects. (God, voice. I still think my random laggy hangs have to do with that, since that's when they started.)

Memory leak! Yes, it's complex, yes, you have to track it down, yes, this should be your number one priority. I've heard, *cough*, that some of those 3rd party fanviewers do not have this problem. Maybe you should actually consider listening to these people who are fixing your viewers? Because it isn't as if they aren't trying to share this information with you.

I know, it's too much to ask for that friends going on/offline, group notices, and, in fact, being anywhere with more than 5 people not cause random lagspikes that freeze me entirely.

This new texture thing makes me cry. Ever so occasionally I'll get the useful thing back...briefly, and then it will break again. Matching offsets becomes so very much more of a headache. And it looks like it's yet another "oh, you use an Nvidia card. Well, too bad"- which was also apparently the source of my cascading crashes, from the information I could track down.

Thursday, April 10, 2008

Blender, the avatar, and you.

You know those evil seams? Yeah, there are things that, while not perfect, can make it easier. With Blender, you can draw right on the avatar. Not with the same precision as a graphics program (in my experience, at least, maybe you're better at it), but for matching up stuff in the problem areas? 100% awesome.

I'm not super great at tutorials, because I tend to skip steps, but here's hoping this is something that isn't totally random. I'm going to try to give a really basic crash course to take you through the whole system. And hope I haven't forgotten steps on the way.


Download Blender, install and all that. Blender is a very weird program, but I think the installation was reasonably straightforward.


Download these avatar Blender files:

(Note: the first one may not be good. The second one is more useful, it should be good as of now, up to when they decide to nuke it again.)

Default model for cross section seams- the avatar on the green axis line has some sections joined crosswise. The one next to it is divided up into each image. Both are in the T pose, so shoulders are not as useful for how things will really hang.

Ruth in 3 poses- the mother of us all. I don't find the model you download off the website to actually be accurate, this is actually Ruth. This is entirely divided into the per images, there are no cross image sections. Also, her feet are the Ruthfeet size, so don't sculpt shoes around it unless you're willing for them to not be size 0. Yes, one of them has shoe morphed feet with max height anyway. This is better for things you want to see the sleeves in, as well as being a nice way to preview what something will look like before importing to SL, if you don't have the clothing previewer (which I think you ought to, personally! I don't know how I could live without it, even with this. It's far more lightweight and compact for previewing). (Bonus for skinners and the like: the eyelashes should be connected properly, and the eyes are also included as a separate texture mapped thingie.)

I'll be working on more avatar models (including guys) to make seeing where things really go easier eventually. You can use the male model off of the website (note: you will have to do a lot of prep, including importing the .obj, which requires a plugin), but I find that it doesn't map particularly true in a lot of areas.


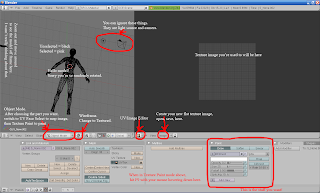
Open the file of choice. Now the fun starts, because there are a jillion and 4 options in Blender, and it can be daunting. Below the black avatar wireframes, there should be a menu. You should be in Object Mode, which is what you need to switch to any time you want to choose which part of the model you want to work on.

First, a note on camera: Hold down Alt, and the mouse button, and you rotate around. Alt+Shift and mouse, and Alt+Ctrl and mouse move different ways (drag around the scene, zoom in/out). I just hold down alt and play around with the others to see what's what, since everything has to use a different camera and it's hard to keep straight! If you've got a mouse with a scrolly wheel, that also zooms in and out (generally, mouse settings vary and all).


Here, have a picture that may not help much that I've scribbled all over:

I've spliced the bottom there in while in Texture Paint, you can't see all of those options while in Object Mode!


Choose the bit you want to work with, with the right button. If you want to join parts of the model together (note, this will mean they share texture images! So don't join unless you _want_ that), shift, select the other parts, and then Ctrl+J to join. Note: Blender does very weird sensitive submenus, if you mouse off of it before clicking to verify, it will not do what you ask! This includes things like saving! Joining is useful with the 3 avatar file, as you can join all the heads, all the torsos, all the legs, and they will all update at once. Currently they are each separate.

The new version of Blender has done away with UV Face Select mode, and collapsed it into Edit mode. Change everywhere I say "UV Face Select" to "Edit Mode" if your version of Blender doesn't have UV Face Select.

Once you've got your selection, go to the Object Mode dropdown, and choose UV Face Select. Now, the windows should all be set up such that in the next panel, you will now see the UV outlines for that piece laid out in that space (this is the UV/Image Editor mode, which only has a face icon visible, click on the dropdown to see the name). If that panel does not have them outlined, hover over the avatar and press A (select all, which toggles selection on and off). It should be selected unless you've clicked off of it. At any time you can unselect a section, if you've clicked on one face, and then select the entire model by pressing A twice (yes, just A, no shift, control, or alt. And you have to have your mouse hovering that section). Your image will not be applied to the entire model, unless the entire model is selected. That includes not being able to draw on it, even though it looks like it's right there.

If you are using the cross image seamed avatar, the stomach will have lines at the bottom, and the pelvis at the top, but the legs and arms and such won't be there! This way we can draw across it all on one image, and it will update top and bottom. You'll have to divide these out later, as well as the fact it won't do anything about the parts that aren't outlined there. (Note: I tend to not do this that much actually due to laziness, since I have to splice out the pieces back to where they belong. Your mileage may vary.)

In the panel with the UV map laid out, go to the Image menu, New, or Open (note: I think it only accepts tgas, but it ignores transparency entirely1, so denote that with a contrasting colour when working on it), and either create a new image of your choice or import something you want to check. Remember, if you're doing the stomach/pelvis, you will have had to prep an image to have both of the necessary pieces in it, that you will divide back up again later.

1This is no longer true in newer versions of Blender. It DOES do transparency, so save your working copies as 24 bit tgas, or don't drop your channel in. Transparency is awesome for trying to get the $*%@#! skirt mesh to line up, crap for everything else.


The image should now appear under the UV map. To get it to appear on your avatar, in the menu under it, there is a strange outlined box thing next to UV Face Select. Click on that dropdown, and choose Textured.

To actually _do_ something with all of this, change UV Face Select to Texture Paint. Hit A to deselect the model so you can see it better. The vertex lines will still be there. If you want them to go away, switch to Object Mode and then to Texture Paint (don't change your selection any), and it will just outline the entire thing in a light pink line around the area you're working on. Both things have their uses.

In the bottom panel that has all that scary menu text, hover your mouse, and hit F9. The Paint panel lets you choose paint colour, opacity, brush size, and all that fun stuff. Draw all over the avatar! Once you're done, go back to that Image menu where you created a new image or opened one you already had, and save it. Blender WILL let you close things without saving! It does not prompt!

If you want to save what you've done with the model as a whole, for instance the joining, you can save it under the File menu. As I said before, Blender does not prompt for saving if you've changed anything!


It actually is less complicated than it looks, once you've done it a few times!

Wednesday, April 9, 2008

Again, wah wah wah, and rampant speculation

Oh god, this way-too-easy-to-post-to-the-wrong-one strikes again. Hah, crap. I didn't mean to keep stirring shit up where it was so visible. I really don't like dramaqueening, but I had to get some of this off my chest so it wasn't just running circles around in my head.

So...crap. I pulled it once I found out, but damage is done, and well, whatever the fallout will be there's no going back and fixing it.


So...today she's sort of "given her notice" that's she's quitting. I'm still confused about a fair bit of the whole matter.

I've heard second/third hand, that she revised the post, and the original version actually went to in to particulars. I want to read that post. Apparently, she ripped into the baby, which would have made me laugh my head off, because if that isn't a case of not getting it, I don't know what is. (I'm sure the rest, of course, would have just pissed me off- although if she'd actually said useful things? I might have let it slide. Violet stared at her cameo until she figured out that due to newscaryWL and SL refusing to save states when updated, that 5 of the gems weren't set full bright. THAT IS EASY TO FIX, IF SOMEONE JUST FUCKING TOLD HER. And you know, when it's not a freebie? A lot of people tend to hunt through their records and send fixed copies to everyone if something's messed up like that. It's pointless doing it with freebies, because there are just too damn many transactions. I overran my 500 a day repeatedly.) I still don't know what was "wrong" with mine- I'm wondering if it's some of the intentional things (oh, I would have cackled if she'd complained the way the pattern worked on the back of the men's version on a woman, because THE MODELS ARE DIFFERENT, and that's why there are two versions! The peck/boob shading and cuts are just an added thing because I had to anyway, and isn't too terribly uncrossable [well, men in the white women's, maybe]. Or bitched that my blacks are too black, hand-staple-forehead, believe it or not, they are dark _and_ have depth, which is a painful line to walk. Maybe your monitor doesn't show it all, mine does. Or that the top/bottoms don't quite match up, which is height of irony given some of the other things she's said- and they come as close as I could manage). Yeah, artists, by nature, tend to be insecure beasts, it's partly to do with tearing our souls bare and sharing them with strangers.

I am still wondering if its a vendetta against someone in particular- but no one I know has ever even heard of her before. An alt, maybe...but still, none of us can think of anyone we've pissed off. That still leaves a couple of people, but seeing as they didn't really have anything to do with the actual build itself...I don't know. I'm sort of peeved she dissed the poseballz, because I wasn't even vaguely started on those. I was way more focused on getting the place up and running, and added a few around as I came to it, whereas I'd been intended to poseball the place up a fair bit more, making some poses for it and such, as well as replacing a bunch that are there, since they were just placeholders while I was figuring out the rest. And now, because she threw a bitchfit, people may think that's all due to her. Um, no, not even a little. It was just one of the little ironic things that made me laugh though, the one pic at the motel, she's in one of the ubiquitous freebie poses that isn't particularly well done- and that's hers, not ours, there's no pose there at all (and, if we're bitching about not having put fancy sits in all the chairs, as that LIBRARY chair there doesn't have one...)

Reading through her archive, also just adds more perplexitude. While she does some feature freebs of quality...there is also a lot of not so much that she gushes over. So, whiskey tango foxtrot?

If I were a really vindictive bitch, I could try to get her banned from groups/sims of people I know. She at least used to be in one group I have a banhammer for, if I wanted to abuse my powers (which I in no way would- I'm not even going to bring up the possibility with the owner, as _she_ might do it anyway if she knew, as yes, we are protective of each other), and I'm sure I could get her banned from the sim as well, if I really wanted. I could probably get her banned from at least one place she actually "shops" (although she pointed out that she's basically a drain on the economy, and not willing to get a job or put money into the system), as she's a friend of a friend, and I haven't really met her entirely due to not being in the same place at the same time yet (and, *cough*, she's bought things from me when I wasn't around, as well). And, I wonder how long it would take her to notice and figure it out, since I certainly wouldn't tell her.

I've even considered the idea of touch-give and pay eventing all my freebs, instead of buys, entirely so I could keep a blacklist of people it wouldn't give stuff to. I won't because it's petty (although, if they aren't going to be gracious, they don't deserve it), and it would be asspainy with the lack of transaction records, that I kind of like even though they aren't all that relevant, just because, you know?, but on the other hand, a networked blacklist with this script very stealthily distributed to content creators so these people didn't know, would be fucking hysterical.

I had thought, perhaps, that aside from backpedal faster bitch damage control, her follow up "wink wink something else is going on here" post (which INFURIATES me, as to me, at least, it implies that she's got something going with ME, and as aforementioned, I have no idea who the fuck she is), was a play at grabbing a piece of the freebie blogging pie. Even bad press being press and all, and a play like this might get her the attention she craves from the blahgosphere. But, since she's backing out, I don't know. Maybe it _was_, until she got a much negative attention as she has (although she says it's all been positive...and maybe it has. Maybe people do feel entitled to not having to spend any money, in which case, yeah...back to my previous "maybe people will eventually figure out this isn't worth it". But at least one of her consistent cheerleaders is a friend, from references in earlier posts, and those I generally negate as useful posts, as friends will have your back even if you're wrong, a lot).

On the other hand, I think a crapton more people went to the motel because of it though, so it actually ended up being a positive thing in every way except emotionally.

Monday, April 7, 2008

In which we whinge and complain more, as this is a less public forum

I was all prepared to bitch more about that certain someone and things related, and I may still because things still somewhat infuriate (not even her in particular, honestly. It's been building a long time with the general thing, and she's just getting my ire as being the last, and most egregious that I've seen directly instead of just hearing about, case of it).

Then there was stuffs on shopping cart re: Cachet and (sloppy) stealing from designers, and *sigh*, yeah, it depresses me how much this is done. (Ok, first off though? How much did upon first glance I think the actual model was the avatar, and that was some damn fine sculpties? Seriously, even at closer inspection, that doesn't look entirely out of the realm of possibility.) Not just the big names like McQueen, but also Leg Avenue (which, gah, is sloppy enough to begin with, although occasionally the design ideas are cute, but wow, do you own any of it? I own one or two and they are so crappily made), Threadless (which is total bullshit unless you're the one who made it there too), Urban Outfitters, etc. etc. I'm not talking inspiration here, I'm talking dead stealing (I skimmed the comments a bit- for instance though Alla Ruff is totally not in the category I'm talking here, even if she did see two things and do a third that had some influences from both but was a totally different thing). (And PC actually gets another category entirely from me, because I don't think they are doing it for serious, but instead for the lollercopters, even if the vast majority of people don't get that it IS parody. It's not hard to spot that it is if you actually look. Look at the blog or website, and tell me they aren't shooting the piss. This is all 100% carefully planned. And, christ, it's even funnier the more people who do this stuff for serious.)

There are people who try to defend it..."RL and SL aren't the same thing!" and such, and yeah...I'm not onboard with that. I'll bet that neither are the people you're copying, if they do decide to turn their eye to you.

Worse to me though, is the cases where you can probably just step up and fucking ask, and they'll say "yeah, go ahead, and my url on it would be totally awesome!" (There are a couple of places that I'm very...sketchy about, I might buy from there otherwise, but they've got items that, while they give credit, I don't see any mention of permission when it most likely could have been obtained...and yeah. It doesn't make me feel good. It's still way less creepy...but still a little "well, did that person say you can make her x?") Case in point: the newest issue of GLAM.

First off, I want to say, not everyone in the mag should be tarred with the brush. There are articles and ads there that have absolutely NOTHING to do with the whole bullshit, other than they ended up in the same publication. There's an awesome article on Jessica Ornitz, and another great article with Fallingwater Cellardoor (and that's not all by half, those are just the ones that jumped out to me). I also love the BJD spread, which, yes, that whole thing is inspired by an actual thing, but I see it as something totally different really. To my knowledge that's based on the general phenomena, not directly one person's thing, and it's become really a huge huge widespread thing that has taken on a life of its own. (I'm also assuming the Nicky Ree ad that makes me cringe is a case of model error, wearing 2 different shades. It sort of has to be, nothing else makes sense, other than possibly Windlight deciding on some new fuckery. Which, you know, really is a possibility. *sigh*)

But. I turned to the 7 Deadly Sins spread (which was actually what caught my interest, following a link from Fleur, curious about their post of "something that worked with the spread but was still something our customers would like"). Vanity is the one that SCREAMED the source material to me (and is currently still her featured). She hadn't finished the whole set when I first saw that, ages ago, but Vanity was one of the 3? if I recall correctly, but it's been a long time, and the memory is fuzzy- but it was the one that stuck out to me (Natalia Zelmanov did a dress of it at one point in the past as well, but she was 100% up front with "this is exactly where it came from"- which still, makes me a little twitchy as forementioned...but she came out and said it, which is a damn good start. AND she gave the url to the source material, which is pretty damn close to good enough, I didn't even have to google it- although explicit credit would still make me more comfortable. I mean, this whole idea is why I won't sell some stuff, period- the Sandman and Transmet stuff I gave out a while back, and it'll never go on sale sale, unless I talk to the respective authors about putting them up for the Comic Book Legal Defense League or something. And as much as I've thought about making a set of Death skins...probably not something I'll ever let other people have. I've got one I wear upon occasion now, but my my skins I don't distribute beyond a very very tiny circle). I thought her art was really neat (and I'm in awe of people who really really digital paint like that, that takes talent. I fuck around a bit, but I don't think I ever have a hope of being that good- although honestly serious recreation of paint in a digital medium is not something I ever plan to spend that much time mastering, it's neat, but I have other things that grab my personal attention more. If I want to paint, I have paint, you know? And, oddly, even though I almost entirely only draw people unless I've got something else in mind or I'm totally scribbling, I hardly ever paint people, and never in the same style as the way I draw. Don't ask me, I don't know. But I'm also not into super realism unless I have a serious reason for it.)

Unless there are credits somewhere I don't see, there's zero mention. And...I wonder how many of the people involved in the spread had any clue what was going on. Casa del Shai's stuff definitely predates (and, doesn't look as much like it as it does there, but god, if I were them, I'd be pretty embarrassed about how it made me look if I found out about it afterwards, since I think their stuff was used the most there). Sloth, which starts it off, has some obvious changes (the skin is quite obviously not "HERE, MAKE THIS" which makes one think that yeah, some of these people probably did get drawn into this unknowingly, and there's the butterfly instead of bubbles, and the hair and dress are only vaguely. I'm thinking the poses all are direct rips, and were made for this, and the heads are just free in some of them. I could be wrong...but they are really really close). Wrath also, disturbing pose/background, but only passing similarities to dress/skin/hair/jewelry. Vanity is from a different angle, and with a direct comparison between the two isn't as direct as it seemed, but still, very obviously trying to recreate it (the makeup is semi generic enough that it's close...but that doesn't actually mean anything). Envy is even trying to do the very distinctive hair, although it's a definite case of not the same makeup. Lust is another case of doubtful on the makeup (note, I'm stressing the makeup here, as it was started as being created for the spread, and I'm thinking that most/all of the people making the skins were not complicit), but you've got the pose, background, and accessories right there. Gluttony is, on inspection, a fair bit different, and most obviously due to head turning- but I'm unfortunately thinking that's just due to not locking the head/neck, and the same goes for Avarice.

Personally...if I were one of the people featured in any of the spread I'd be very uncomfortable with it. But, I don't think they really had anything to do with it, this may just be a case of photographer's etc. Which, hell, they do in Vogue from time to time to some degree...but any time I've noticed it they are 100% up front about it, even when it's generic enough they don't have to be. That's what makes me squirm- doubly so because it's a person who's a solo artist, and probably does actually answer their emails, so actually clearing it might have been really easy. (Yeah, there's the possibility they'll say no, but is just steamrolling ahead without clearing it better? I say no, personally.)

We've all, I'm sure, been guilty of it to some degree, from fan doodles to whatnot. When money enters into it, I become a lot more uncomfortable about the whole thing though. If I was contracted to do something, would I? To a degree, probably yes (in fact, to a degree definitely yes, although it was far less of a clearcut thing, I still wasn't superthrilled), if I'd agreed to beforehand without knowing whatall exactly was involved. I'd be far less likely to continue my contract beyond the original term, and I'd try to make it as much "inspired by" and not "oh hai, I just ripped that off" as I could, generally. As much as there are sometimes things that yeah, I might like to have, I don't really like directly copying, just generally.

Will I prove myself a total hypocrite somewhere down the line? Quite possibly. It's easy to stand in judgment over someone else, whereas you may not see it when you're in it. I'm also way less into it when it's a little guy. Big corps, yeah, you might get your ass sued if they turn their lawyers loose on you, but the little guys are a) approachable, so you can actually do something about clearing it, and b) way less obvious, although moreso in the world post internet and sensory overload, so yeah, you may well still get caught with your pants down.

Friday, March 21, 2008

Limitations of Blogger

I've been hunting for a while for a way to do cuts. So far...not good options. I want to do a proper CUT, which doesn't show the stuff anywhere but on the page for the post itself. This is great for, say, cutting bits for the feed to chunk a post nicely. WTB lj-cut text="This should be simple"

Apparently, not so much. This looks like the most straightforward manner (and, don't try to use Blogger's official help as it's completely hopeless and incomprehensible). But, this does 2 things. 1) if you can find the body tag (which, I can't), and add the second bit, every single post will have the "read more" link, regardless of whether it's got a cut or not (if not, you need to manually add a link to the post before the cut to take people to the page with the rest of it). 2) And in my mind, the thing that makes it useless, all it's doing is having you drop the stuff you want cut in a span that it hides. Which means...it's still there. All of it. Just invisible only on your page o' posts because that's the only place the stylesheet turns it off. Feedreaders completely ignore the cuts, and show the full text, because they haven't been told to ignore it with css.

Wordpress appears to have a _real_ way to do cuts, I'm pretty disappointed blogger doesn't even consider the possibility.

Wednesday, February 20, 2008

ramble

SL is being a brat today, and constantly crashing me- I am lucky if I get 5 minutes before I crash again, and that's just too much to bear, so I give up.

I'm, in my plodding way, working on a few things. Most of my energy has been going towards a jacket (the shoulders alone took a day, and I'd still prefer them a bit crisper, but we work with what we're given), which still needs little tweaks here and there, and then gets the rest of the 12 variants worked up (that should at least be a, comparatively speaking, easy part- half are variations that SL leads to, with the way it works, and divided the other direction, they are things that one would be able to do if it were an actual item of physical clothing). Currently I think it will be just the one colour though, I'm not sure anything suits it but black. The pants were easy, assuming I don't decide they are too plain, but then I need to come up with a shirt. I'm sort of floating on that and haven't really figured it out yet.

Mind you, this jacket was going to be something a fair bit different, as part of a completely different set. Which I still may try to put together soon, although to look at them I don't think anyone would see how the one could be related to the other (general spookiness and colour scheme aside). I'm still referring to both sets by the same name in the meantime, as I haven't decided which to rename, what.

The shoulder things, which are just me being masochistic as shoulders already fill me with irk since I generally want them to sit not where the inherent seams are, were only made as possible (without me working on it for a month or so, still being thoroughly disgusted, and finally giving up after upload after upload after upload) with a different workflow I've managed to get functioning with Blender. I would say it's like cheating...but it still takes for frigging ever, even with the help, and honestly if we were doing Real Professional Video Game Things, this is even a gimpier version of what would be available (primarily due to just using Blender, and not one of the fancier 3D suites). I'll be sharing it soon as I get things together enough to do so, right now I'm very seat of my pantsing it- more scattered, and more work required to make it useful. I'd like to get things a bit more organized and less painful to work with before I try to encourage others to use it much- but on the bright side, I've picked up a few tricks that make it easier for me to set up once I get that far now, that will increase consistency and such other useful type things.

I'm 50% done with the female set for the original concept as well, although it's taken a back burner to getting this suit working. Frustration aside, the jacket's somewhat exciting (even if certain poses, as always, have a tendency to distort things in less than optimal ways, that annoys the crap out of me- even AOless, the shoulders, especially, are far enough forward to wreck the lines around the chest/shoulder area, nevermind all the slouchy or leaning poses that disrupt beautiful lines of buttons...it can't be helped, of course, even with a more sophisticated model, there will always be Things. It is largely my fault for coming up with things that require fighting the system instead of working with it), and I'm pretty chuffed with how it's coming out.

And then there's that corset dress. That should just be a case of coming up with colours now, I believe (which, as evinced by the striped pants, I have a tendency to over engineer- but even though I'm rarely in anything other than black, black, and black, I like a good shocking colour range- I'm highly tempted to go for 2 shades in each of my fav colours [yellow and orange, as always, excluded], and then there's the possibility of duotones...which I really really don't have the room for. Maybe someday I'll do up some of the other alts in my head for special occasions or whatnot), which is always a beast with prim limits and all. (I've got to vendor up the pants, to reduce..8? to 3.) I've tweaked it slightly from the last version I was working with (I'll probably still wear the other, as Alle isn't all that attributed in the chest area), but I think I've gotten the majority of a handle on all the bits. Annoyances with attachment points and skirts aside, which I've at least figured out a way to get good enough, if not perfect (as, in this case, perfection is technically impossible).

I've still got to do something about my HUD as well- I'm now down to minor interface things, convenience vs. lag. I'm leaning towards convenience, as the way to manage multiple bits the less laggy way is quite inconvenient really. Added on, I've never seen any real indicator comparing the two methods (nor a way to get the concrete numbers myself), other than a "well, this is bad unless necessary, and don't do it too much." I would like to know ways to really judge load on scripts- there are things that I've been doing in a less efficient way on the one hand, trying to avoid functions that are stated as inefficient themselves- and have no way to judge whether it's a good idea or not.

I'm also a touch irked I figured out I can't do all my sits in one script in a parent prim, being no Link equivalent function. I could use the SetLinkPrimParams hack, but I don't know whether that is actually working again, nor whether someone will decide to break it in the future, as well as it being substantially more regimented, and not in a desirable way in this case. While I would assume just sit targets (and anim calls) wouldn't be super nasty on server load, by their very existence scripts cause some, before they even actually _do_ anything, so the minimal number is better (when not trumped by convenience, or script limitations).

Monday, February 11, 2008

Treasure hunts

I've got to get back to useful things, I haven't been in the mood to get all the things I want together for something that, to me at least, will be insanely useful for actually making things without quite so much trial and error.

But I wanted to collect my thoughts on this now, while I was still thinking about it.

I like a good treasure hunt. I end up throwing away half or more of the things I get, but the looking can be fun, as well as the potential for bargains. I love me a good sale, even though I don't really have any plans to hold any myself. But to be brutally honest, I don't think the grid wide Valentine hunt was as successful as it should have been.

1) It was over too short a period. One weekend, with that long a list of participants, means people are just going to be running through. As I would assume the entire point here was a marketing/visibility/traffic thing, having people scrutinizing underneath your furniture and up in your rafters and then running to the next location isn't as useful as, say, having it go for a week bookended by two weekends, so people can look around and oh hey, what's that over there, I rather fancy that.

2) It was a tad disorganized- I know we're not official hunt coordinators here and things go wrong, but at least one person had nothing to do with it and didn't know how they ended up on the list (and was probably pissed when people kept IMing them "where's the box? can i have a hint?"). One person didn't realize they were in it because they thought they missed the deadline, and so didn't make anything for it, and hurriedly threw something together to put out in another manner as an apology. One place had an old LM and had moved locations (and, I heard chatter than their box was broken or somesuch). Am I the only one who thought they would have double checked everyone on the list to make sure they were ready?

3) Some items were hid too well. If you've got a small shop area, yeah, feel free to shrink your box and stash it behind something. When your shop spans half a sim, put it in the back, or upstairs, fairly obvious. Make them work enough to wander through and see things, but not so much they get frustrated and pissed- remember, you want to make a good impression on these people so they think of you and come back when they have more time. One place apparently hid boxes inside of prims, which is dirty pool. Added on, the short time period meant people were likely to get frustrated and pissed in fast forward. Honestly, I don't think the places that made the boxes tower over people with big blinky arrows did it right either- while they didn't get people irked at them, neither did they encourage any looking around and seeing what they had.

4) There was no clarity as how many boxes were where. A couple of shop owners placed out signs "there's one here, and two over there" or thuslike, but otherwise it was a total crapshoot. Is there a valentine or an anti here? Are there both? And some places there were more than one of one type. With how hard some places hid things, you were left unsatisfied not knowing whether you'd finished that place or not.

Sunday, January 27, 2008

SLUP!

I'm trying out SLUP, which lets you upload 20 textures a month for free. I hadn't really known what I was going to use it for, and I'm still not sure how much I shall, but I figured it was a neat thing to have, just in case, someday. Maybe pictures of my cats when I'm feeling cheap.

I might use it when the Beta Grid's being a pissy beast. Like, oh, now. Eventually I plan to have real avatars exported so I don't need to do as much testing on things with the less-than-accurate models they provide for us.

Note: it's in Japanese, so my very broken and out of practice kana tells me that キャンセル means "Cancel" and アップロード means "Upload". Aside from that...just guess a lot, like I do, I suppose. Currently there is no tga or png support, although it appears planned (I tried a bmp however, and it appeared to work- but there are no options in the SLUP like upload lossless and such). When you upload, the creator will be slup Reiko, not you- they do not ask for your SL account info beyond your username. As such, I wouldn't really recommend it for anything you want to have your name as creator on, obviously- which is why I shan't be using it for real versions, but I might use it to, say, compare SLuploader and regularly uploaded versions of sculpties. (As an aside, I uploaded a couple of small textures that needed pixel perfect reproductions, and while it may be on SL's part when you see it, even with SLuploader, they are not pixel perfect, and the seams are quite obvious. Means that I will have to unnecessarily use larger textures for some things, which it somewhat irksome. I'm trying to reduce the load on your system here, and you just tell me no.)

Wednesday, January 16, 2008

Attention designers!

My tenure at Le Cadre' (which is changing it's name to Sensual somethingorother anyway now) is coming to an end. I could petition to stay, but I've never made that place a priority, I've been far more concerned with building up the La Reina shop. However! the end of me being there is the beginning of you being able to!

Go to http://blog.sensualdesigns.net/ and check it out. Live rent free for 3 months (well, the cost of a classified ad). If you help work the area, you probably can work on being able to stay longer, as well.

(Also, the Marasmius or however it's spelled shop is gone. I'll be moving into a new place sometime, that has exciting possibilities. But I'm not immediately planning on replacing the third location again.)

Monday, January 7, 2008

Texturing the Avatar with Blender

You should know basics of texturing first- see Natalia Zelmanov's tutorials, they are quite well done.

Mostly I recommend this for seam matching and some previewing, I, at least, don't have the sort of fine control to want to use Blender to do the whole thing (especially without layers!), but seams can be a bitch (although I did just paint a sculpty in Blender, and he came out pretty nice really- but still, I did a little bit of post processing in Photoshop to make it all happy and right). I just figured out how to maybe make them less bitchy! I would have loved knowing this forever ago. But at least now I have hope with this damn corset that's been giving me a headache and still not quite working with massive amounts of guessing and zooming and pixel tweaking (stupid complex irregular pattern).

Go to the SL site and download the avatar mesh, if you haven't. Mostly you will have it somewhere, in some form, because you're using something to preview it unless you really are crazy and like working without a net (I do all my previewing with the SL Clothing Previewer- it isn't perfect by any means, but it gives me enough of an idea I can manage in most cases), but basically, you need a file that ends in .obj that has the avatar mesh (male or female, I always work on female because I find it wraps a bit more accurately to SL, although still not accurate, especially around the face).

Go to the Blender importer page and grab the Wavefront obj one, and put in your Program Files\Blender Foundation\Blender\.blender\scripts directory, as previously stated in the av painting intro.

Delete the cylinder that's probably there with the delete key (and say yes...Blender's popups sure can be annoying). Go through the same annoying importing in Blender: File->Import->Wavefront (.obj), navigate the clunky file navigation, don't move your cursor because the popup window will go away and leave you wondering why everything's broken, say ok to the popup at default values. Now you should have a teensy tiny person. Zoom in (remember nav keys are holding down alt and nothing, shift, or ctrl, and the left mouse button, as well as the middle scrollwheel doing strange and potentially useful things). You're still in Object Mode, so select the pieces you want to match seams on. For matching the waist seams, select the stomach and then shift select the pelvis to have both of them highlighted, and ctrl-J to join them into one (say yes to another annoying popup). GLEE. Now that horrible awkward seam there can be painted directly on! (Do a separate join and image for the arm and shoulder seams, so you don't have things overlapping on the UV map, since those are also one of the horrible things, same with legs.)

With your stomachpelvis selected still, choose UV Face Select Mode in the dropdown menu. In the dropdown next to it, pick Textured, the weird nobbly thing at the top. Your second window, as always, should be the UV/Image Editor, and you should see odd highlighted outlines of the stomach and the pelvis, in the places in the image that they are in the map files we get to do all of our mapping from.

Now, your choice: you probably have something that just needs some seam fixing, so take the pelvis part of that and paste it in the proper place at the top over an image that has the stomach part, and Open that image in the UV/Image Editor; or you can just paint the whole thing directly onto the avatar mesh in Blender. Me, I'll be going with option 1, because I am far more comfortable with my lots of layers and things in Photoshop. (When doing the shoulder/arm seams you can just grab an upper body texture without the splicing, since it's all in one image to begin with.)

Hit A to deselect all, so you can see what you're doing better (The light grey lines are still slightly annoying, but they do show you were you need to pay attention to, and they aren't super huge), and change the UV/Face Select panel with your 3D view to Texture Paint Mode. In the Buttons panel with all the menu options, hit F9 to go to Editting, and play around with your brush settings in the Paint panel.

I'll be importing particular layers with the parts (wrinkles, etc.) that go over the edges, not the finished product, myself (both so I can keep working with all my layers, and so it's easier to finish the fine tuning fixing). Also, note that it doesn't always do the very edge that's only a partial pixel- keep in mind that you will probably still need to clean up and expand those parts to make them work properly (especially with shrinking down, since you ought to be working at 1024, at least), as well as the fact it tends to do hard pixely edges if you've dropped your brush small enough for detail work. Once you've finished with this image, Save it off in the UV/Image Editor window menu, and then you can move to cleanup in something else. Once you've done all that cleaning, import it again to make sure you've pulled things across properly.

It might be a good idea to save your joined up avatar for later, so you don't have to reimport and rejoin all the assorted bits. You may want two copies, one with the upper all together, and the lower all together, and a second with the upper/lower joins, since side seams are also a pain to align (this might speed up my guess, import to the clothing previewer, move one part one pixel up, import to clothing previewer, move one more pixel up and one over, import to clothing previewer...etc.)

Of course, there's also the importing into SL to take into account- things will not be as perfect there as they are here. For one, avatar textures get resized to 512, for another we have to deal with the crappy JPEG2000 compression. In fact, I find to match up my waist seams, I usually have to import the lower body that connects to an upper at 1024 (i.e. my corsets- they have enough fine detail it really does matter, the coats don't), just to trick the compression into being less awful (I upload everything else at 512, including lower bodies that don't need to match up exactly).

Sunday, January 6, 2008

Importing Sculpt Maps to Blender

Say you are (an idiot) like me, and after playing around with modifying a sculpty you've been working on you remapped the UV and saved that off....and then forgot to save the file. Since Blender doesn't prompt to save new versions when you've changed something, sometimes you accidentally screw yourself.

Step one: curse profusely. Step two: do a google search and find these plug ins (if you can't see the forum post for whatever reason, here's the download link (and thank you, Domino Marama).

Drop those files in your Program Files\Blender Foundation\Blender\.blender\scripts directory (only the import_sculptie.py is required for importing, however the others may be useful!), and there should be an option in your File->Import dropdown that makes the magic happen. Yay! Once again, watch for that option popup (read the readme attached for what the options do, this time some of them actually are useful to change sometimes, although it defaults to what you usually want to work with, assuming sphere mapping and less pain with seams).

If you change your sculpt and need to remap it any, you will have to add a new material (F5), set to Texface, add three new textures set to blend (F6), and set them (F5) to: x, blank blank, red 1.0, Add; y, blank, blank, green 1.0, Add; z, blank, blank, blue 1.0, Add, and then Bake (F10) Textures, going through the normal material setup (I've gone over that in more detail before if this is too sketchy for you, however, these are the reminder for the things that need to be hit). Once the new materials are added and set up, hit that big Bake button, as you should know by now, to make with the flavour rainbow- and now we're back to just as if we hadn't lost it all in the first place. (One can also use Rokuro for the basic shape and import for making it a less regimented shape in this way, so if we wanted to not admit I'm an idiot, we would use this as the excuse for figuring it out instead.)

Saturday, January 5, 2008

Blender and Av painting intro

I'm still learning the ropes in texturing in Blender quite heavily, but I'm currently trying to paint a sculpty to go with avatar mesh stuff, so here are some notes to remind myself how to not be frustrated for 3 hours trying to figure out why my view is on crack.

First step is to download the av meshes- SL's website has that downlaod section with the obj files, and I think I have 7 other copies from other sources (q/avimator might have them in formats that help, the clothing previewer, who knows what else). I do basically everything on the female mesh. One part because I am one, and one part because I find the "default" male mesh doesn't wrap quite right (of course, the one in SL is somewhat of an annoying mess, I think, as well- just in slightly different ways).

Next is to import- go to Blender's importer list and snag the Wavefront OBJ Importer/Exporter, drop that file in your Program Files\Blender Foundation\Blender\.blender\scripts directory.

Fire up Blender and choose File->Import->Wavefront .obj, and a file menu will appear at the bottom. Navigate through the amazingly clunky DOS like interface to find your file, and import it- but don't move your cursor from the button! This popup happens with all sorts of options which you mostly want to ignore, and just hit ok. However, if you move your cursor it disappears and your file does not import, and you're standing there going "well, crap. I thought that was supposed to work" for a month or two.

The avatar imports really small, so zoom in to see it. It's also all detached bits, select all the ones that map together with shift, and hit crtl-J to join them into one (everything will be UV mapped properly). I haven't tried it because I just figured this all out tonight, but I'll bet you can connect the top of the lower body and the bottom of the upper, and be able to paint across those dastardly seams!

When trying to paint a sculpt with the av mesh around for reference, still in Object mode select the avatar first, then shift select the sculpt so it's last selected. This way you won't get the sculpt making the avatar invisible walls (try switching to UV Face Select just with the sculpt selected, and you will probably see what I mean. It drove me nuts for a bit until I found out how to make it not happen. EDIT: Or even with it your view may decide to be on crack with a new file for NO APPARENT REASON even when you do do this, so...yeah, I've got to find a new way to trick it into behaving). To put an existing texture on the avatar mesh (or anything else), select it in Object mode, select all in UV Face Select mode, and then import your image. You can paint directly on that in Texture Paint mode, as well.

Friday, January 4, 2008

Freebies and SL

There has been a freebie explosion in SL lately. There's a bit of controversy over it, some shopkeepers throwing fits because people are taking their freebies but not buying.

You will never sell as much as you give away. It's just a simple fact, people will take things that are free, whether they like them or not. Some will try them once and throw them away because they don't like them, but there's no way for you to know that. Expecting to see the same number of sales as freebies is completely unreasonable.

Freebies can be a good marketing tool. I timed the stockings to my first clothing release, and more people came with the announcement of "hey, get the free stuff" to actually look at what I had, and yes, some people bought as well. I attracted people who would not have come to the store, including a few who did buy things, by pimping the free. Freebies also can get you blogged, so you have another chance of sticking out amongst the crowd- because there is an insane amount of competition in SL, as well as the world itself being so huge that people aren't going to know you exist. By adding more freebies irregularly during the season, I had a little bit more traffic trickle back, as well.

Comparing my sales (although it isn't a completely legitimate comparison, as many things converged in one case to all make it better), being blogged by a high profile fashion blog is better than freebies, but you can't count on that- I got an amazingly awesome review, and this one was cold because I found sending things off to reviewers didn't really work. However, the way for bloggers to find you if they aren't going to pay attention to their inventories is to see your name somewhere else. Grabbing attention with freebies gets your name out there!

Of course, there are a lot of people who simply won't put money into the system. New accounts start with 0 Lindens, which is pretty daunting, especially when you're talking the influx from CSI, people who aren't there for the SL experience, but for the TV tie in, who may be sucked in...but it may take a while. They get a lot of freebies to try to hold their interest! If good things are thrown at them, they may say "gee, this is neat, maybe I'll stick around" and eventually end up with money to spend, as well. But, there are people who won't buy things because they're cheap (or, very rarely). I don't buy things often, most of the clothing I wear cost me 10 Lindens a piece...for upload fees. This is for a number of reasons, partly Allegory is hard to outfit because she does have such a concrete style and attitude in my mind, but partly it's that whole DIY thing, I like making my own clothes (I also don't buy skins because I like Alle's ridiculously pale skin and wacky makeup whenever I get bored). I've often considered funneling money into an alt who could wear pretty dresses...but then, I spend a lot of my SL time building, not showing off.

The vast majority of people who would have bought your products, without all the freebies, still will. You are not losing out on a customer base. If you've got a lot of traffic and nothing is moving, maybe you should re-evaluate: is what I'm selling of a good enough quality people will want it? Is it universal appeal enough (and do I want to make things I don't want to make it be)? And, in one particular case: am I trying to sell things based upon my "celebrity" and then deciding people suck because they don't all run to throw money at me? The Paris Hilton phenomenon isn't as prevalent in SL, THANK GOD.

Some getting started in Blender

SL is being a crashy little bitch tonight, so I might as well get to some of this finally.

Work smarter, not harder: download the premapped sphere. I have my own that I did the hard way, with a bit different window set up, but this means you don't have to go through all that! And really, my setup is not much different. One less window on the side (I just have one 3d view and the texture on the side, then the panels at the bottom). But, this gets you what you need, so run with it!

Spheres are the most useful to me. Nine times out of ten, I'm using a sphere to start. Occasionally another shape is better, and for that you will have to prep your own- this tutorial gives you a pretty good rundown on that, just choose a different shape for starters if necessary (remember to prep your seams: it has to be able to unmap into one big flat square, so you need a top, a bottom, and 2 sides. Also keep in mind that it has to be a perfect grid).

In the big window with your rainbow sphere, switch from Object Mode to Sculpt Mode in the dropdown. You may find switching to Solid in the dropdown next to that is more useful, since otherwise you can't really see highs and lows and shadows so well. Hit F9 while hovering over the Panels at the bottom to bring up the Editing Panel, and the third block of things over should have tabs: Multirez, Sculpt, Brush. Hit up the Sculpt tab, and start playing with brushes! I start off by blocking out my basic shape (the wireframe view may even be of use here, so you can see your vertices: where your vertices are counts! Textures will map differently, you'll have different amounts of detail, and you may need to cluster vertices in certain areas and leave others as large expanses to get the detail in the model you need) with grab, draw, and even hopping over to the Edit Mode and grabbing points and shoving them where I want them. First run of my sculpts are usually very rough sketches, just to get everything in vaguely the right vicinity. I go in and clean them up with a lot of the smooth tool, white still flipping back and forth with the others to keep detail. Some things require hopping over to Edit to pull individual vertices where they ought to be. Select with the right mouse button (hold down shift for more than one), then hit G to move them around. I cannot tell you how long it took me to stumble across the right thing to find that.

Watch your poles. Depending on how you're going to map, they may make a huge difference. Because you're starting with a mapped sphere, there are no end points. Look in wireframe to see the fact you've got open circles at each end. This causes some problems. If you're not mapping sphere, these ends are going to do other things, but in that case you know what they'll do, so I'm ignoring it. If mapping sphere however, those ends are going to be somewhat messily filled in, with textures pulled off the other side of the model if the texture is mapped 1x1. I've talked about it before at more length, this is just a reminder- grab the whole line of them, and shrink them down to one point, and work with them that way. I usually do that earlier _and_ later in the modeling, as I generally end up pulling them out of whack when prodding at my shape. Select two vertices next to each other, hit ctrl-E and select Edge Loop Select to highlight the whole circle of them, then S and scale it all down to one little bit. Now you don't have to worry as much about texturing (but keep in mind, if either end is massively different in texture, you're going to end up with the dotbleed you already get on spheres at 1x1 texturing).

Switch brushes in that bottom panel, type and size both, to achieve different effects. There are easy peasy symmetry buttons at the bottom of that too- if your model needs to be symmetrical select what you need- you can do a lot of your modeling with symmetry to get the basic shape, and then take it off to do more detailing on either side as well.

Basic camera controls: Hold down alt and left mouse button rotates. Alt+crtl+left button zooms, alt+shift+left button moves. The scroll wheel does odd things in these modes as well that you may or may not find useful.

At a glance, I think the map you come with is 64x64, which is what you want, so you can even just bake over that and save it off. Once you've got your sculpting all happy (for starting out, try something simple so as to not get frustrated: I have a long line of wacky melty skulls I played around with, only some of which I've bothered to keep, but basic construction is one direction symmetry, poke some holes for eyes, poke a nose hole, and shove around the jaw. I wasn't going for realism, because I knew I couldn't attain it, as well as not really caring to achieve it), hit F10 in the Panels, and press that big Bake button in the Bake tab. Your rainbow image should now look like a different rainbow image, save that off as a tga, and ta-dah! you've got a sculpty!

Of course, make sure you save a new file often during this process so you can go back when you've messed up when trying to make it better and suchlike. I usually have 10 or 20 versions of even reasonably simple things, just in case I need to go back. Once you've got it sculpted, save off your final version, trash the earliers unless they have potential to turn into something else, and then you can move on to some of the evils of texturing. You've already gotten enough of a crash course here in the tools that you should be able to sort of muddle your way through it, I think.